Create a multipage app
In Additional features, we introduced multipage apps, including how to define pages, structure and run multipage apps, and navigate between pages in the user interface. You can read more details in our guide to Multipage apps
In this guide, let’s put our understanding of multipage apps to use by converting the previous version of our streamlit hello app to a multipage app!
Motivation
Before Streamlit 1.10.0, the streamlit hello command was a large single-page app. As there was no support for multiple pages, we resorted to splitting the app's content using st.selectbox in the sidebar to choose what content to run. The content is comprised of three demos for plotting, mapping, and dataframes.
Here's what the code and single-page app looked like:
hello.py (👈 Toggle to expand)
import streamlit as st

def intro():
    import streamlit as st

    st.write("# Welcome to Streamlit! 👋")
    st.sidebar.success("Select a demo above.")

    st.markdown(
        """
        Streamlit is an open-source app framework built specifically for
        Machine Learning and Data Science projects.

        **👈 Select a demo from the dropdown on the left** to see some examples
        of what Streamlit can do!

        ### Want to learn more?

        - Check out [streamlit.io](https://streamlit.io)
        - Jump into our [documentation](https://docs.streamlit.io)
        - Ask a question in our [community
          forums](https://discuss.streamlit.io)

        ### See more complex demos

        - Use a neural net to [analyze the Udacity Self-driving Car Image
          Dataset](https://github.com/streamlit/demo-self-driving)
        - Explore a [New York City rideshare dataset](https://github.com/streamlit/demo-uber-nyc-pickups)
    """
    )

def mapping_demo():
    import streamlit as st
    import pandas as pd
    import pydeck as pdk

    from urllib.error import URLError

    st.markdown(f"# {list(page_names_to_funcs.keys())[2]}")
    st.write(
        """
        This demo shows how to use
[`st.pydeck_chart`](https://docs.streamlit.io/develop/api-reference/charts/st.pydeck_chart)
to display geospatial data.
"""
    )

    @st.cache_data
    def from_data_file(filename):
        url = (
            "http://raw.githubusercontent.com/streamlit/"
            "example-data/master/hello/v1/%s" % filename
        )
        return pd.read_json(url)

    try:
        ALL_LAYERS = {
            "Bike Rentals": pdk.Layer(
                "HexagonLayer",
                data=from_data_file("bike_rental_stats.json"),
                get_position=["lon", "lat"],
                radius=200,
                elevation_scale=4,
                elevation_range=[0, 1000],
                extruded=True,
            ),
            "Bart Stop Exits": pdk.Layer(
                "ScatterplotLayer",
                data=from_data_file("bart_stop_stats.json"),
                get_position=["lon", "lat"],
                get_color=[200, 30, 0, 160],
                get_radius="[exits]",
                radius_scale=0.05,
            ),
            "Bart Stop Names": pdk.Layer(
                "TextLayer",
                data=from_data_file("bart_stop_stats.json"),
                get_position=["lon", "lat"],
                get_text="name",
                get_color=[0, 0, 0, 200],
                get_size=15,
                get_alignment_baseline="'bottom'",
            ),
            "Outbound Flow": pdk.Layer(
                "ArcLayer",
                data=from_data_file("bart_path_stats.json"),
                get_source_position=["lon", "lat"],
                get_target_position=["lon2", "lat2"],
                get_source_color=[200, 30, 0, 160],
                get_target_color=[200, 30, 0, 160],
                auto_highlight=True,
                width_scale=0.0001,
                get_width="outbound",
                width_min_pixels=3,
                width_max_pixels=30,
            ),
        }
        st.sidebar.markdown("### Map Layers")
        selected_layers = [
            layer
            for layer_name, layer in ALL_LAYERS.items()
            if st.sidebar.checkbox(layer_name, True)
        ]
        if selected_layers:
            st.pydeck_chart(
                pdk.Deck(
                    map_style=None,
                    initial_view_state={
                        "latitude": 37.76,
                        "longitude": -122.4,
                        "zoom": 11,
                        "pitch": 50,
                    },
                    layers=selected_layers,
                )
            )
        else:
            st.error("Please choose at least one layer above.")
    except URLError as e:
        st.error(
            """
            **This demo requires internet access.**

            Connection error: %s
        """
            % e.reason
        )

def plotting_demo():
    import streamlit as st
    import time
    import numpy as np

    st.markdown(f'# {list(page_names_to_funcs.keys())[1]}')
    st.write(
        """
        This demo illustrates a combination of plotting and animation with
Streamlit. We're generating a bunch of random numbers in a loop for around
5 seconds. Enjoy!
"""
    )

    progress_bar = st.sidebar.progress(0)
    status_text = st.sidebar.empty()
    data = np.random.randn(1, 1)
    chart = st.empty()
    chart.line_chart(data)

    for i in range(1, 101):
        new_rows = data[-1, :] + np.random.randn(5, 1).cumsum(axis=0)
        data = np.concatenate([data, new_rows])
        status_text.text("%i%% Complete" % i)
        chart.line_chart(data)
        progress_bar.progress(i)
        time.sleep(0.05)

    progress_bar.empty()

    # Streamlit widgets automatically run the script from top to bottom. Since
    # this button is not connected to any other logic, it just causes a plain
    # rerun.
    st.button("Re-run")


def data_frame_demo():
    import streamlit as st
    import pandas as pd
    import altair as alt

    from urllib.error import URLError

    st.markdown(f"# {list(page_names_to_funcs.keys())[3]}")
    st.write(
        """
        This demo shows how to use `st.write` to visualize Pandas DataFrames.

(Data courtesy of the [UN Data Explorer](http://data.un.org/Explorer.aspx).)
"""
    )

    @st.cache_data
    def get_UN_data():
        AWS_BUCKET_URL = "http://streamlit-demo-data.s3-us-west-2.amazonaws.com"
        df = pd.read_csv(AWS_BUCKET_URL + "/agri.csv.gz")
        return df.set_index("Region")

    try:
        df = get_UN_data()
        countries = st.multiselect(
            "Choose countries", list(df.index), ["China", "United States of America"]
        )
        if not countries:
            st.error("Please select at least one country.")
        else:
            data = df.loc[countries]
            data /= 1000000.0
            st.write("### Gross Agricultural Production ($B)", data.sort_index())

            data = data.T.reset_index()
            data = pd.melt(data, id_vars=["index"]).rename(
                columns={"index": "year", "value": "Gross Agricultural Product ($B)"}
            )
            chart = (
                alt.Chart(data)
                .mark_area(opacity=0.3)
                .encode(
                    x="year:T",
                    y=alt.Y("Gross Agricultural Product ($B):Q", stack=None),
                    color="Region:N",
                )
            )
            st.altair_chart(chart, width="stretch")
    except URLError as e:
        st.error(
            """
            **This demo requires internet access.**

            Connection error: %s
        """
            % e.reason
        )

page_names_to_funcs = {
    "—": intro,
    "Plotting Demo": plotting_demo,
    "Mapping Demo": mapping_demo,
    "DataFrame Demo": data_frame_demo
}

demo_name = st.sidebar.selectbox("Choose a demo", page_names_to_funcs.keys())
page_names_to_funcs[demo_name]()
Notice how large the file is! Each app “page" is written as a function, and the selectbox is used to pick which page to display. As our app grows, maintaining the code requires a lot of additional overhead. Moreover, we’re limited by the st.selectbox UI to choose which “page" to run, we can't give each page its own title in the browser tab, and we’re unable to navigate between pages using URLs.
Convert an existing app into a multipage app
Now that we've identified the limitations of a single-page app, what can we do about it? Armed with our knowledge from the previous section, we can convert the existing app to be a multipage app, of course! At a high level, we need to perform the following steps:
- Create a new
app_pagesfolder next tohello.py. - Move
hello.pyintoapp_pages, and keep only the code for the intro page in it. - Create three new files inside of
app_pages:app_pages/plotting_demo.pyapp_pages/mapping_demo.pyapp_pages/dataframe_demo.py
- Move the contents of the
plotting_demo,mapping_demo, anddata_frame_demofunctions into their corresponding new files from Step 3. - Create a new entrypoint file,
streamlit_app.py, that defines the pages withst.Pageand connects them withst.navigation. - Run
streamlit run streamlit_app.pyto view your newly converted multipage app!
The result has this file structure:
your_repository/
├── app_pages/
│   ├── dataframe_demo.py
│   ├── hello.py
│   ├── mapping_demo.py
│   └── plotting_demo.py
└── streamlit_app.py
Now, let’s walk through each step of the process and view the corresponding changes in code.
Create the intro page
app_pages/hello.py
import streamlit as st

st.write("# Welcome to Streamlit! 👋")

st.sidebar.success("Select a demo above.")

st.markdown(
    """
    Streamlit is an open-source app framework built specifically for
    Machine Learning and Data Science projects.
    **👈 Select a demo from the sidebar** to see some examples
    of what Streamlit can do!
    ### Want to learn more?
    - Check out [streamlit.io](https://streamlit.io)
    - Jump into our [documentation](https://docs.streamlit.io)
    - Ask a question in our [community
        forums](https://discuss.streamlit.io)
    ### See more complex demos
    - Use a neural net to [analyze the Udacity Self-driving Car Image
        Dataset](https://github.com/streamlit/demo-self-driving)
    - Explore a [New York City rideshare dataset](https://github.com/streamlit/demo-uber-nyc-pickups)
"""
)
The intro page only contains the code for the intro. We'll set its title and icon in the entrypoint file later.
Create multiple pages
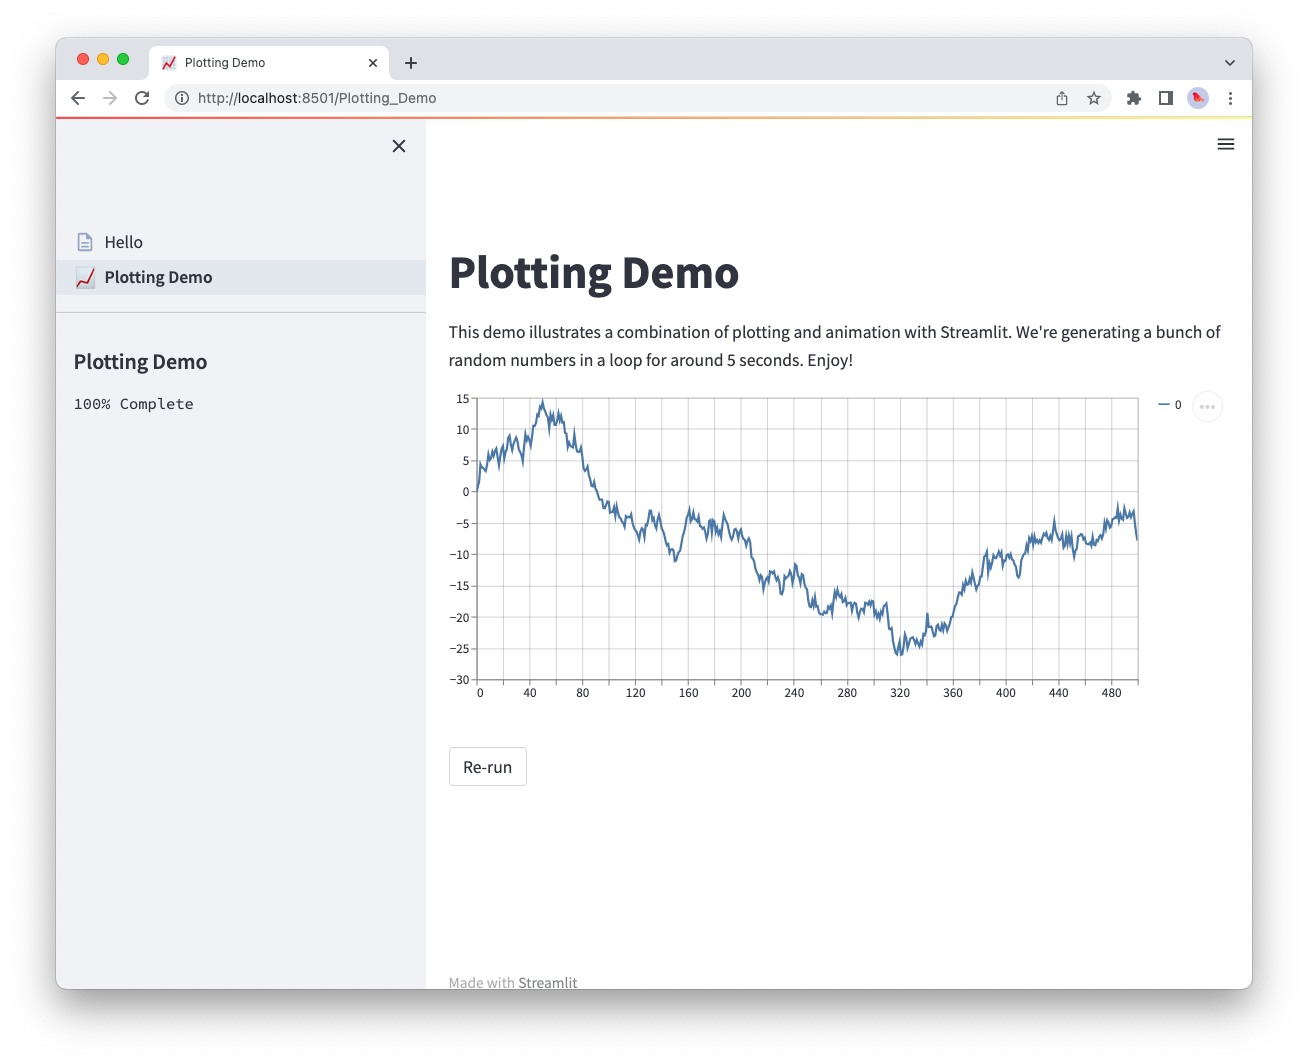
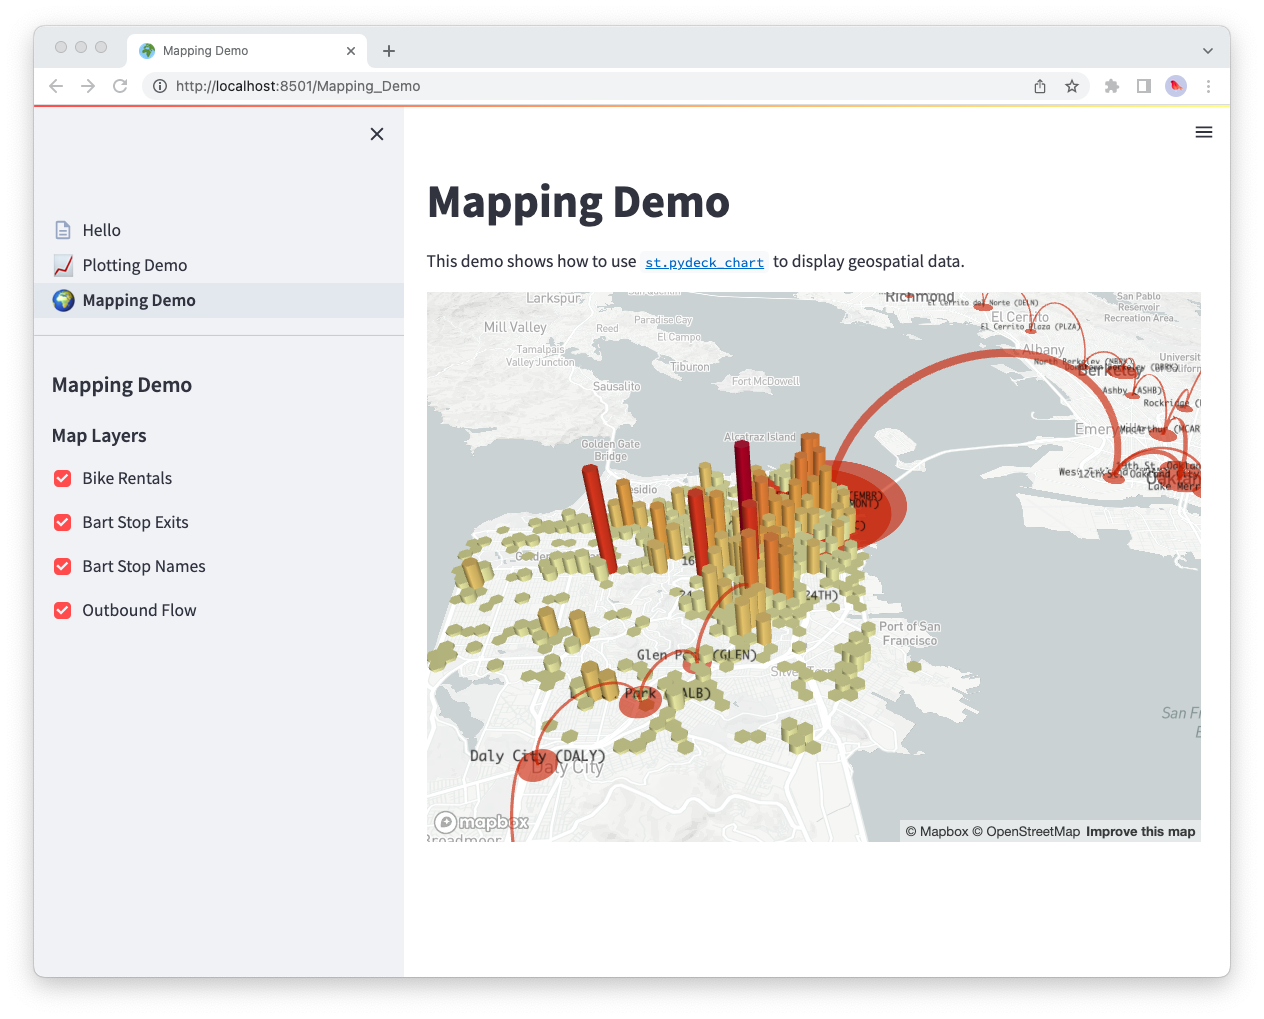
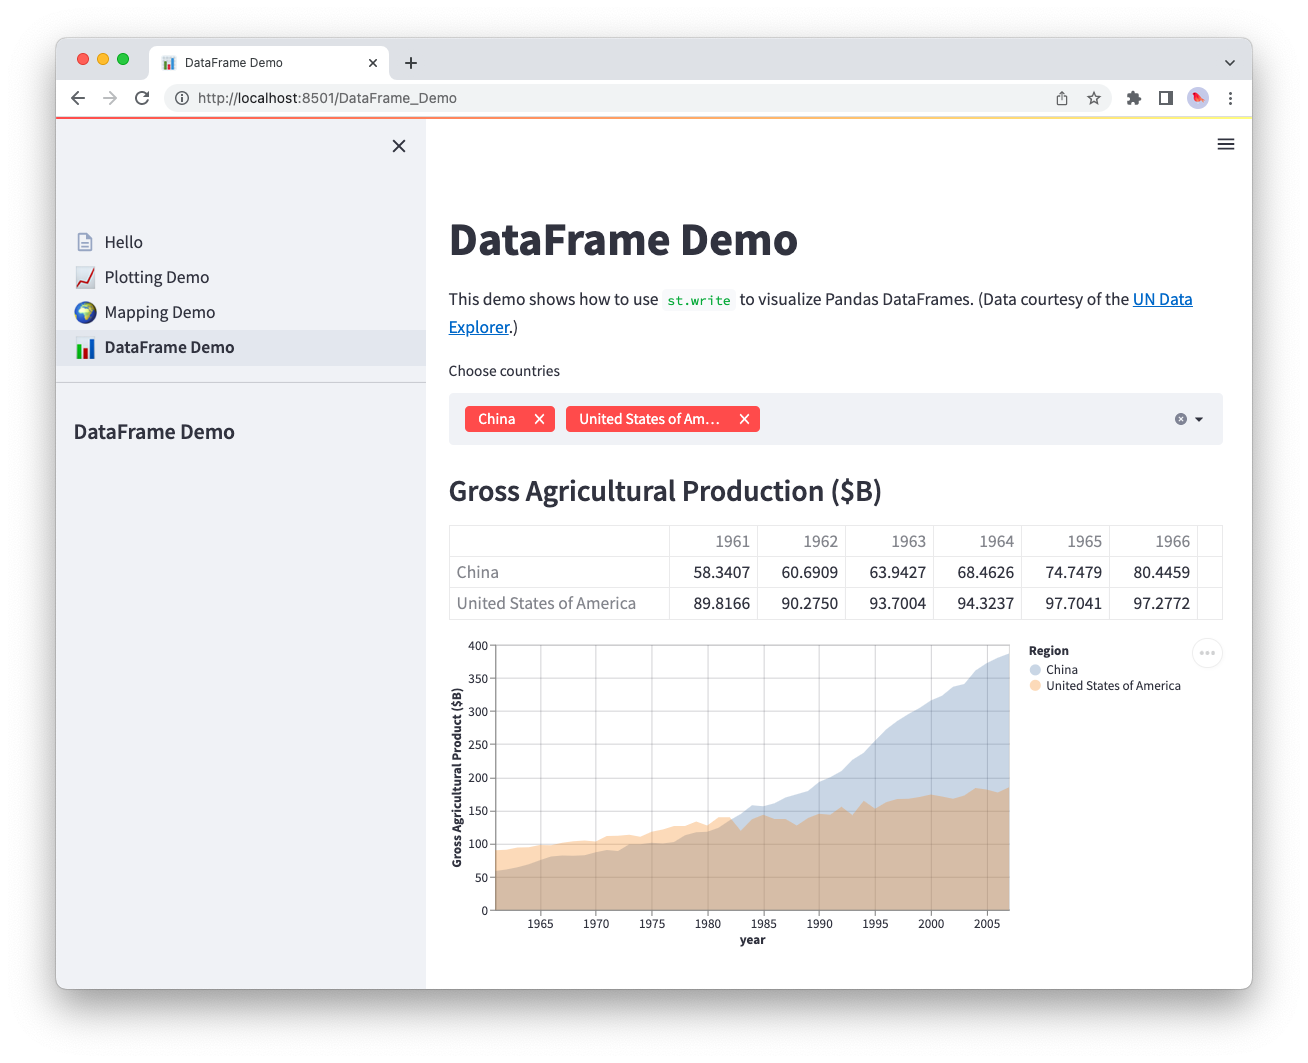
For each demo, we create a new file inside the app_pages folder and add the demo code into it. Each page file is a regular Streamlit script.
Check out the code for each page below!
app_pages/plotting_demo.py
import streamlit as st
import time
import numpy as np

st.markdown("# Plotting Demo")
st.sidebar.header("Plotting Demo")
st.write(
    """This demo illustrates a combination of plotting and animation with
Streamlit. We're generating a bunch of random numbers in a loop for around
5 seconds. Enjoy!"""
)

progress_bar = st.sidebar.progress(0)
status_text = st.sidebar.empty()
data = np.random.randn(1, 1)
chart = st.empty()
chart.line_chart(data)

for i in range(1, 101):
    new_rows = data[-1, :] + np.random.randn(5, 1).cumsum(axis=0)
    data = np.concatenate([data, new_rows])
    status_text.text("%i%% Complete" % i)
    chart.line_chart(data)
    progress_bar.progress(i)
    time.sleep(0.05)

progress_bar.empty()

# Streamlit widgets automatically run the script from top to bottom. Since
# this button is not connected to any other logic, it just causes a plain
# rerun.
st.button("Re-run")
app_pages/mapping_demo.py
import streamlit as st
import pandas as pd
import pydeck as pdk
from urllib.error import URLError

st.markdown("# Mapping Demo")
st.sidebar.header("Mapping Demo")
st.write(
    """This demo shows how to use
[`st.pydeck_chart`](https://docs.streamlit.io/develop/api-reference/charts/st.pydeck_chart)
to display geospatial data."""
)


@st.cache_data
def from_data_file(filename):
    url = (
        "http://raw.githubusercontent.com/streamlit/"
        "example-data/master/hello/v1/%s" % filename
    )
    return pd.read_json(url)


try:
    ALL_LAYERS = {
        "Bike Rentals": pdk.Layer(
            "HexagonLayer",
            data=from_data_file("bike_rental_stats.json"),
            get_position=["lon", "lat"],
            radius=200,
            elevation_scale=4,
            elevation_range=[0, 1000],
            extruded=True,
        ),
        "Bart Stop Exits": pdk.Layer(
            "ScatterplotLayer",
            data=from_data_file("bart_stop_stats.json"),
            get_position=["lon", "lat"],
            get_color=[200, 30, 0, 160],
            get_radius="[exits]",
            radius_scale=0.05,
        ),
        "Bart Stop Names": pdk.Layer(
            "TextLayer",
            data=from_data_file("bart_stop_stats.json"),
            get_position=["lon", "lat"],
            get_text="name",
            get_color=[0, 0, 0, 200],
            get_size=15,
            get_alignment_baseline="'bottom'",
        ),
        "Outbound Flow": pdk.Layer(
            "ArcLayer",
            data=from_data_file("bart_path_stats.json"),
            get_source_position=["lon", "lat"],
            get_target_position=["lon2", "lat2"],
            get_source_color=[200, 30, 0, 160],
            get_target_color=[200, 30, 0, 160],
            auto_highlight=True,
            width_scale=0.0001,
            get_width="outbound",
            width_min_pixels=3,
            width_max_pixels=30,
        ),
    }
    st.sidebar.markdown("### Map Layers")
    selected_layers = [
        layer
        for layer_name, layer in ALL_LAYERS.items()
        if st.sidebar.checkbox(layer_name, True)
    ]
    if selected_layers:
        st.pydeck_chart(
            pdk.Deck(
                map_style=None,
                initial_view_state={
                    "latitude": 37.76,
                    "longitude": -122.4,
                    "zoom": 11,
                    "pitch": 50,
                },
                layers=selected_layers,
            )
        )
    else:
        st.error("Please choose at least one layer above.")
except URLError as e:
    st.error(
        """
        **This demo requires internet access.**
        Connection error: %s
    """
        % e.reason
    )
app_pages/dataframe_demo.py
import streamlit as st
import pandas as pd
import altair as alt
from urllib.error import URLError

st.markdown("# DataFrame Demo")
st.sidebar.header("DataFrame Demo")
st.write(
    """This demo shows how to use `st.write` to visualize Pandas DataFrames.
(Data courtesy of the [UN Data Explorer](http://data.un.org/Explorer.aspx).)"""
)


@st.cache_data
def get_UN_data():
    AWS_BUCKET_URL = "http://streamlit-demo-data.s3-us-west-2.amazonaws.com"
    df = pd.read_csv(AWS_BUCKET_URL + "/agri.csv.gz")
    return df.set_index("Region")


try:
    df = get_UN_data()
    countries = st.multiselect(
        "Choose countries", list(df.index), ["China", "United States of America"]
    )
    if not countries:
        st.error("Please select at least one country.")
    else:
        data = df.loc[countries]
        data /= 1000000.0
        st.write("### Gross Agricultural Production ($B)", data.sort_index())

        data = data.T.reset_index()
        data = pd.melt(data, id_vars=["index"]).rename(
            columns={"index": "year", "value": "Gross Agricultural Product ($B)"}
        )
        chart = (
            alt.Chart(data)
            .mark_area(opacity=0.3)
            .encode(
                x="year:T",
                y=alt.Y("Gross Agricultural Product ($B):Q", stack=None),
                color="Region:N",
            )
        )
        st.altair_chart(chart, width="stretch")
except URLError as e:
    st.error(
        """
        **This demo requires internet access.**
        Connection error: %s
    """
        % e.reason
    )
With our pages created, we can now put it all together.
Create the entrypoint file
The entrypoint file is the file you pass to streamlit run. It defines each page with st.Page, connects them with st.navigation, and runs the page the user selected. st.Page sets the label and icon that appear in the navigation menu and the browser tab. Each page also gets its own URL.
streamlit_app.py
import streamlit as st

page = st.navigation(
    [
        st.Page("app_pages/hello.py", title="Hello", icon="👋"),
        st.Page("app_pages/plotting_demo.py", title="Plotting demo", icon="📈"),
        st.Page("app_pages/mapping_demo.py", title="Mapping demo", icon="🌍"),
        st.Page("app_pages/dataframe_demo.py", title="DataFrame demo", icon="📊"),
    ]
)
page.run()
The first page in the list is the default page that opens when a user visits your app. The order of the list sets the order in the navigation menu, so you can rearrange pages without renaming any files.
Run the multipage app
To run your newly converted multipage app, run:
streamlit run streamlit_app.py
That’s it! Streamlit shows a navigation menu in the sidebar with all four pages, and runs the selected page.
Next steps
Congratulations! 🎉 If you've read this far, chances are you've learned to create both single-page and multipage apps. Where you go from here is entirely up to your creativity! We’re excited to see what you’ll build now that adding additional pages to your apps is easier than ever. Try adding more pages to the app we've just built as an exercise. Also, stop by the forum to show off your multipage apps with the Streamlit community! 🎈
Here are a few resources to help you get started:
- Deploy your app for free on Streamlit's Community Cloud.
- Post a question or share your multipage app on our community forum.
- Check out our documentation on Multipage apps.
- Read through Concepts for things like caching, theming, and adding statefulness to apps.
- Browse our API reference for examples of every Streamlit command.
Still have questions?
Our forums are full of helpful information and Streamlit experts.